Replacing your bicycle’s handlebars can dramatically improve your comfort and control on daily commutes. As an avid ebike commuter, I know that a handlebar replacement might sound daunting, but it’s absolutely achievable as a DIY project with basic tools.
This guide will walk you through why you might want to swap your handlebars, how to choose a compatible new bar for commuting, and step-by-step instructions to do it yourself—so you can ride with confidence and a personalized, ergonomic setup.
Quick Summary of Handlebar Replacement
-
DIY Friendly: Changing your handlebar is a straightforward task you can do at home with an Allen key set and a few other basic tools. It involves removing the grips and controls, swapping the bar, and reattaching everything securely.
-
Commuting Comfort: Upgrading to a bar that suits your riding style can reduce strain on your wrists, shoulders, and back. Many commuters prefer a higher or more swept-back handlebar for an upright posture, which is more comfortable for casual and commuter riding (less stress on your back and shoulders).
-
Compatibility Matters: Ensure the new handlebar fits your bike’s stem. Most city and commuter bike handlebars have a clamp diameter of 25.4 mm or 31.8 mm (and some mountain bikes use 35 mm). Use a caliper to measure your current bar’s diameter so the new one matches. Also check that the width and shape of the new bar won’t strain your cables or wiring.
-
Handlebar Types: For urban commuting, common handlebar styles include flat bars, riser bars, and swept-back (cruiser) bars. Flat bars give good control and moderate upright posture—great for city navigation. Riser bars add height for a more relaxed upright position, improving comfort on longer rides. Swept-back cruiser bars offer maximum comfort with an upright stance and natural wrist angle, reducing back and shoulder strain. Choose the style that best suits your comfort and handling needs.
-
Secure Installation: Always center the handlebar in the stem and tighten the faceplate bolts evenly to the manufacturer’s torque spec. After installation, double-check that nothing is loose or misaligned. A short test ride is wise to ensure your new handlebar position feels right and everything is secure.
Why Replace Your Handlebar for Commuting Comfort
Daily commuting can be tough on your body if your bike’s cockpit isn’t suited to you. Many stock e-bikes come with generic flat bars that might not perfectly match your ergonomics. Replacing the handlebar can address common comfort issues:
Reduce Strain
The handlebar greatly influences your posture. A properly chosen bar can reduce strain on your wrists, shoulders, and back, making your ride more enjoyable and less fatiguing.
For example, a higher-rise or swept-back bar encourages an upright posture that many commuter riders find more natural, relieving pressure on the lower back.
If you’ve been feeling numb hands or a stiff neck after rides, a handlebar change could help by adjusting your riding position.
Better Control and Stability
A handlebar that fits your shoulder width and preferred reach improves handling. Commuters often navigate traffic and tight spaces, so having the right width is key.
Narrower handlebars can make it easier to maneuver through city traffic, while still providing enough leverage. On the other hand, if stability feels lacking, a slightly wider bar might give you more control.
Replacing your bar lets you fine-tune this width to your comfort.
Personalized Fit
Everyone’s body and commute are different. Some riders have longer arms or prefer a more forward lean, while others want to sit upright.
By choosing a bar with the appropriate rise (height) and sweep (backward bend), you tailor the bike to you. For instance, a modest riser bar can lift your hand position up, which many find eases pressure on the shoulders during casual rides.
Meanwhile, a bar with a back-sweep (like a cruiser or “North Road” style bar) brings the grips closer and angles them inward for a relaxed wrist position, great for comfort on mellow rides.
Replacing Damaged or Uncomfortable Bars
Sometimes the need is straightforward—your current handlebar might be bent from a tip-over or just uncomfortable (too low, too wide/narrow, or odd angle).
Rather than tolerating discomfort, swapping to a better-suited handlebar can transform your daily commute. It’s a relatively low-cost upgrade that can yield big improvements in ride quality and confidence.
In short, upgrading your handlebar can make a world of difference in how your e-bike feels on daily rides. It’s about tuning the bike’s main touch point to better fit your body and riding needs, which ultimately boosts both comfort and control.
Choosing the Right Handlebar and Ensuring Compatibility
Selecting the ideal replacement handlebar requires balancing comfort with the practical matter of fit. Let’s break down what to consider to get a handlebar that both feels great for commuting and is fully compatible with your bike.
Handlebar Types for Commuters
Not all handlebars are the same. Here are common types you’ll encounter and how they suit commuting:
Flat Handlebars
These are straight (or with a slight backwards sweep) bars found on many hybrid, city, and mountain bikes.
Flat bars offer excellent control and a moderately upright posture. They are ideal for navigating city streets, giving stability and easy handling.
Many commuter e-bikes come standard with flat bars because they provide a good balance of control and comfort for everyday rides.
If you're researching commuter e-bikes that come stock with this sensible flat-bar geometry, the Macfox X1S commuter e-bike ships with exactly that setup — control-forward, upright, and tuned for the urban conditions this guide keeps returning to.
If you like a sporty feel but still want heads-up visibility in traffic, a flat bar is a solid choice.
Riser Handlebars
A riser bar is essentially a flat bar that curves upward at the ends, raising your hand position a few centimeters.
By elevating the grips above the stem, riser bars create a more relaxed, upright riding position than completely flat bars. This can relieve pressure on your back and wrists, which is helpful on longer commutes or bumpy roads.
Riser bars still maintain excellent control (they’re popular on mountain bikes for rough terrain control) while giving you a bit more comfort.
For commuters who feel their current flat bar is too low or aggressive, a riser could be the answer.
Swept-Back (Cruiser) Handlebars
Often called cruiser bars or North Road bars, these have a pronounced backwards sweep and sometimes an upward bend as well. They bend toward the rider, allowing a natural hand position and very upright posture.
This design prioritizes comfort – your spine is straight, and your shoulders relax. Such bars are common on comfort and classic city bikes (think Dutch-style commuters) because they reduce strain on your back and shoulders.
The trade-off is that they are less aerodynamic and can feel a bit less precise at high speeds, but for easygoing urban commuting, they’re wonderfully pleasant.
If you crave a relaxed cruise to work, a swept-back handlebar might suit you best.
Drop or Other Bars
Drop bars (the curled-under style on road bikes) are less common on commuter e-bikes, but some riders who want speed or multi-hand positions might consider them.
They allow an aerodynamic posture but sacrifice some low-speed maneuverability and put more weight on your hands.
Switching from flat to drop bars is a more involved conversion (requiring different brake/shift levers), so it’s usually not a simple swap. Most commuters stick to some variety of flat/riser/cruiser bar which are directly interchangeable on flat-bar bikes.
There are also “bullhorn” bars (straight with upturned ends) or “butterfly”/trekking bars (multi-position touring bars), but these are niche options. For the majority, a flat, riser, or swept bar will cover the needs.
Choosing your style: Think about your daily route and comfort. If you value an upright view of traffic and comfort over speed, lean toward riser or swept bars.
If you dart through busy streets and want agile handling, a flat bar (perhaps slightly narrower) might be best.
Commuters often prefer flat or riser bars for their blend of control and comfort, but plenty enjoy the ease of a cruiser bar for shorter, relaxed rides.
The good news is that within the flat/riser category, there are many shapes (different sweeps, rises, widths) to fine-tune your fit.
Recommended: What’s Considered High Miles on an Electric Bike? Here’s the Truth
Check Size and Compatibility

Using a caliper to measure the handlebar clamp diameter (here showing 31.8 mm) ensures your new bar will be compatible with your bike’s stem.
Before you click “buy” on that shiny new handlebar, it’s critical to verify it will physically fit your bike. Here’s what to check:
Stem Clamp Diameter
This is the single most important compatibility factor. The “clamp diameter” is the thickness of the handlebar at its center where it attaches to the stem. Your new bar must match your stem’s clamp size.
Common sizes are 25.4 mm (found on many older or comfort bikes) and 31.8 mm (the modern standard on most e-bikes and MTBs). Some high-end or downhill-oriented bikes use 35 mm bars.
Check your current handlebar or stem for markings (often printed on them), or use a caliper to measure the diameter accurately.
If the sizes don’t match, you’d need to also replace the stem or use a shim adapter – but it’s far easier to just get a bar that fits from the start.
Bar Width
Handlebar width is generally a personal choice, but make sure the new bar isn’t so wide that your control cables (brake, shifter, or electronic wires) won’t reach.
Most stock commuter e-bikes come with moderately wide bars (around 600–700 mm). If you go significantly wider, check that your brake lines and electrical cables have slack.
Conversely, if you go much narrower, ensure you can still fit all your controls on the bar comfortably.
In tight urban riding, you might favor a slightly narrower bar for weaving through traffic, but don’t go too narrow for your shoulders. A rule of thumb is to roughly match your shoulder width for optimal control.
Handlebar Diameter at Grip Area
Nearly all standard flat/riser bars have a 22.2 mm diameter at the grip sections, which is where brake levers, shifters, and grips clamp on.
This is a universal size for mountain and hybrid bike controls, so in general if you stay with a similar style bar, your existing controls will fit on the new bar with no issue.
(Drop bars, in contrast, often use 23.8 mm for road levers, which is one reason road and flat bars aren’t directly interchangeable without new parts.)
For a commuter swapping one flat/riser/cruiser bar to another, you likely won’t need new controls—just transfer over the ones you have.
Rise and Sweep Compatibility
If your new bar has a very different rise (height) or sweep angle, consider a couple of things.
A big rise (tall handlebars) might require longer cables, especially the front brake or display wiring, since the bars will sit higher.
A bar with extreme sweep that pulls the grips far back might likewise need extra cable length. Most moderate changes are fine, but if you’re making a dramatic switch (say from a flat bar to a highly swept cruiser bar), double-check cable slack.
It’s frustrating to install a bar and find your brake hose is too taut when turning. You can often reroute cables or get longer ones if needed, but it’s something to be mindful of.
On the flip side, if you switch to a lower or straighter bar, you might end up with some excess cable loop; usually not a safety issue but you may want to tidy it with zip-ties.
Note your Current Setup
Before taking everything apart, it’s smart to take a couple of photos or measurements of your existing handlebar position. Jot down the current bar’s width, rise, and sweep if you know them, and mark the angle it’s set at.
This info is invaluable for setting up the new bar at a comfortable angle and position later. For instance, you can measure how far the grips are above the saddle or how much back-sweep you effectively have, so you can match or fine-tune with the new handlebar.
It’s much easier to recreate a position you liked (or consciously change it) when you have a reference.
By taking the time to confirm these compatibility details, you’ll save yourself headaches during installation. The goal is to have a new handlebar that slides right into place and works with all your existing parts so you can enjoy the improvements without any surprises.
Recommended: 2025's Best Affordable Electric Bikes to Buy Now
Tools and Preparation for DIY Handlebar Replacement

Essential tools for a handlebar swap include a set of Allen wrenches (hex keys) for the various bolts, a torque wrench for precise tightening, and a caliper to measure diameters for compatibility checks.
Tackling a DIY handlebar replacement is very doable, but you’ll want to gather a few tools and set aside some workspace before diving in. Here’s how to prep:
Tools You’ll Need:
-
Allen Keys (Hex Wrenches): Virtually all bikes use hex bolts to secure the handlebar and controls. Common sizes are 4 mm, 5 mm, or 6 mm for stem faceplate bolts and brake lever clamps.
A multi-tool can work, but a dedicated Allen wrench or driver will give you better leverage. It’s good to have the full small range (say 2 mm through 6 mm) handy in case your bell or accessory uses a tiny screw.
-
Torque Wrench (Optional but Recommended): This is a wrench that measures how tight a bolt is. While not strictly required, using a torque wrench ensures you tighten the new handlebar’s bolts to the correct specification (usually measured in Newton-meters, e.g. 5–8 N·m for many stems).
Over-tightening can crush a lightweight handlebar or strip threads, and under-tightening can be dangerous. If you have one, plan to use it when clamping the new bar.
Many experienced DIYers do it by feel, but if you’re newer to bike maintenance, a torque wrench brings peace of mind.
-
Caliper or Ruler: As mentioned in compatibility, a caliper helps measure the diameter of your handlebars and stem clamp precisely. If you don’t have one, you can sometimes get by with a ruler (measuring across the bar’s thickness), but a caliper is more accurate especially for distinguishing 31.8 vs 30.8 mm, etc. This is mainly used beforehand to ensure you ordered the correct size bar.
-
Screwdrivers or Torx keys: Depending on your bike, some accessories or grips might use different fasteners. For instance, some handlebar grips have a small Phillips screw or a Torx bolt for locking. Check your bike’s components; if your grips or controls use Torx bolts (common on some brands for things like brake clamps), have the appropriate Torx key (often T25) ready.
-
Knife or Air Compressor (for old grips): If you have non-locking rubber grips (the kind that are just pushed on), they can be tricky to remove. You might use a thin screwdriver and a squirt of isopropyl alcohol to loosen them, or carefully cut them off if you’re replacing grips anyway. Lock-on grips are much easier—just loosen their small hex bolt and slide off.
-
Cloth and Tape: It’s handy to have a rag to protect your bike’s finish and some tape or rubber bands to hold dangling cables out of the way during the swap.
Preparation Steps:
-
Park the Bike Securely: Work on a stable bike. If you have a repair stand, great—clamp the bike so the front wheel is off the ground slightly. If not, you can lean the bike against a wall or flip it upside down onto the saddle and handlebars (though you’ll be removing the handlebar, so upside-down might not be ideal here).
In a pinch, have a friend hold the bike. The main thing is to prevent the front end from twisting unexpectedly while you work on the stem.
-
Gather Your Components: Have your new handlebar at the ready, and any new accessories (perhaps you bought new grips or a new stem as well). This way once the old bar is off, you’re not scrambling to open packages.
It’s also wise to check that the new bar indeed is the correct diameter before you remove the old one—just compare the center areas or even test-fit it in the stem if possible (without fully installing).
-
Remove Accessories in Order: You’ll want to take off everything attached to your old handlebar before you can swap it out. It’s best to do this in a systematic order so you remember where everything goes and don’t tangle cables. Generally, the grips, brake levers, and shifters (and any extras like a bell, horn, phone mount, or display) all need to slide off the bar.
Plan a spot to set these aside safely (maybe lay them on a towel on the floor). If you’re worried about orientation, snap a quick photo of your handlebar setup beforehand for reference.
-
Protect Cables: While the controls are dangling free, be mindful of your cables. Don’t let brake levers hang by their hoses in a way that puts strain on them. You can temporarily zip-tie or tape a loose brake lever to the frame so the cable isn’t bending sharply.
Generally, if the bike is just stationary it’s fine, but just use a bit of care not to kink any lines while you work.
With tools on hand and these preparations, you’re ready to get down to business. Replacing the handlebar will be easiest if you take it step-by-step, as we’ll do next.
Recommended: How fast does a 750 watt Electric Bike Go
Step-by-Step: How to Replace Your E-Bike Handlebar

Before we dive in, take a deep breath and relax — you’ve got this! The key is to go step by step. We’ll start with removing the old handlebar, then install the new one, and finally put everything back together.
Loosening the stem faceplate bolts (usually four hex screws) allows you to remove the old handlebar once all the controls are off. Always hold onto the handlebar as you loosen the last bolt, so it doesn’t drop unexpectedly.
Now, let’s go through the process:
Remove Grips and Accessories
Begin by taking off all items on your current handlebar. Loosen the screw or clamp on your grips and slide them off the bar ends.
Next, use the appropriate Allen key to loosen the brake lever clamps and shifter clamps (and any other devices like bell or display).
Slide each component off one end of the handlebar, in sequence: typically grips first, then brake levers, then shifters. If your cables aren’t long enough to slide things off easily, you might need to remove one side at a time (for instance, everything off the right side, then everything off the left side).
Keep the removed parts organized. Tip: It helps to have the bike upright with the front wheel between your knees for stability during this step.
Also, avoid twisting or bending cables harshly as you remove the controls – let them hang gently without kinks.
Loosen the Stem Faceplate
The handlebar is clamped by the stem’s faceplate (usually a plate with four bolts at the front of the stem). Using the correct size hex wrench (often 4 mm or 5 mm), gradually loosen these bolts in an X pattern.
In other words, don’t remove one bolt fully while the others are tight; give each a turn to evenly reduce tension.
As you loosen the last bolt, hold the handlebar with one hand so it doesn’t drop. Once all four bolts are loose, remove the faceplate completely (and be careful to set aside the plate and bolts somewhere safe – it’s easy to drop and lose these small parts).
Remove the Old Handlebar
Now the bar should be free to come out of the stem. Gently slide the old handlebar out of the stem clamp. If it seems stuck, double-check that the faceplate bolts are fully loose (you usually don’t need to remove them entirely; just enough to slip the bar, but if needed you can take them out).
Occasionally, a bar might be slightly wedged due to paint friction or if the stem cap is a tight fit – a light wiggle or tap should free it.
Take a moment to compare the old bar and new bar side by side. Ensure the new one is oriented correctly (most have markings at the center and possibly a logo that faces you or forward).
Recommended: How to Fix Your Electric Bike Throttle: Quick and Easy Solutions
Prepare the New Bar for Installation
If you noted any alignment marks or angles from your old setup, keep those in mind now. Center markings on the new bar will help you align it perfectly in the stem.
Position the new handlebar into the stem’s clamp area. Make sure it’s centered (the distance from the stem to each end of the bar should be equal, often the centering marks help with this).
Also, if the bar has any rise or sweep, verify you’re installing it in the correct orientation (sounds obvious, but it’s possible to accidentally rotate a riser bar upside-down; the higher sweep should curve up toward you, not down).
Attach the Faceplate Loosely
Place the stem faceplate back over the handlebar and thread in the bolts by hand. Tighten the bolts lightly and evenly, just enough to hold the bar in place but still allow movement. At this stage, you should still be able to rotate the handlebar within the clamp with some effort.
Make sure the cables for your brakes and shifters are not trapped awkwardly; they should wrap around the front of the bike as before without looping strangely around the stem.
Adjust the Handlebar Angle
Sit on the bike (or simulate your riding position) and rotate the handlebar to find the best angle. This means rolling it forward or backward within the clamp to get the desired wrist position.
For flat bars, many people like to have a slight backward sweep (if the bar has any) aligned with their natural hand angle.
For riser or swept bars, you might adjust how much the bar sweeps back toward you. There’s no fixed rule—adjust until it feels natural for your wrists and gives you a comfortable reach.
Usually, a good starting point is to mirror the angle of your old bar (if you liked it), or set the bar roughly perpendicular to the ground for flat bars.
Take your time here; small changes can affect comfort. Once you’re happy, keep a hand on the bar to maintain that angle.
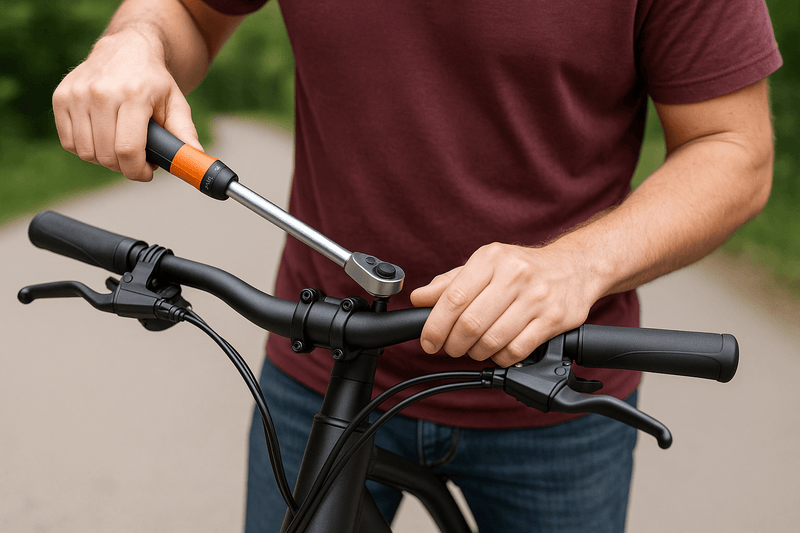
Tighten the Stem Bolts Securely
Now, gradually tighten the faceplate bolts in a cross-pattern (diagonally alternating) so the pressure is applied evenly. For example, give the top-left bolt a turn, then bottom-right, then top-right, then bottom-left, and repeat.
Ensure the gap between faceplate and stem is equal on top and bottom as you tighten. Use your torque wrench if you have one, and tighten each bolt to the manufacturer’s recommended torque (often something like 5–6 N·m, but check your stem or its manual).
If you don’t have a torque wrench, tighten until they’re snug and equally tight – typically a firm hand-tightening without straining or “cranking” hard.
It’s crucial these are tight enough that the bar can’t slip while riding, but not so tight that you risk stripping threads or crushing the bar. The faceplate should clamp the bar firmly with no play.
Reinstall Brake Levers and Shifters
Take the brake levers and slide them back onto the new handlebar (usually from the ends inward).
Position the left and right levers roughly symmetrically – a common technique is to angle them downward at about 45 degrees from horizontal, which fits most people’s wrists naturally when reaching out.
Don’t fully tighten the clamps yet; leave them just loose enough that you can rotate the levers with some effort. Do the same for your shifters and any other clamp-on accessories (throttle, display, bell, etc.), putting everything roughly in place.
It helps to loosely tighten each item just enough that it stays put, but still can be nudged for final adjustments.
Recommended: Best Affordable E-Bikes for College Commuting
Slide On Grips (and Bar Ends if any)
If you’re reusing your old grips, slide them back on to the ends of the bar. For lock-on grips, position them and tighten their small hex screws until secure (typically just a few Nm of torque).
For push-on grips, you might need to use some grip glue or hairspray to help them stick (if you cut them off, use new grips).
If you use bar ends or handguards, install those at this time as well. Make sure the grips are fully on and not hanging off the edge of the bar.
Fine-Tune Control Positions
Now go back to your brake levers and shifters that you left a bit loose. Position the brake levers at a comfortable angle – you should be able to reach them easily with one or two fingers without straining your wrist. They should also not hit your other fingers when pulled.
Once satisfied, tighten their clamps firmly (usually ~5 mm Allen key, snug but not over-tight).
Adjust the shifter positions similarly so you can reach them with your thumb/finger comfortably while your hands are on the grips. Tighten those clamps.
Don’t forget any e-bike display or throttle: ensure it’s visible and reachable, then secure its clamp.
As a general rule, nothing on the bar should rotate if you apply moderate force – if a brake lever twists when you push on it, it needs to be tighter.
Double-Check Everything
Go over each bolt one more time: the stem faceplate bolts are tight and even? Brake levers and other controls secure? Grips locked on?
Also check that your cables are running smoothly: turn the handlebar all the way left and right to be sure the cables aren’t stretched or getting pinched. All wires should have enough slack for full steering motion.
If you see a cable going taut, you may need to re-route it or, if necessary, consider a longer cable. Most commuter bikes will be fine, but this check is important.
Test Ride and Final Adjustments
Take the bike on a short, safe test ride (even just up the street and back). Pay attention to your comfort and the bike’s handling.
Does the handlebar feel secure (no creaking or twisting)? Is the angle comfortable for your wrists?
You might find you prefer to rotate the bar a few degrees up or down, or maybe slide the brake levers slightly inward or outward to better fit your hand position.
These micro-adjustments are normal. After riding a day or two, re-check the stem bolts and lever bolts—occasionally they can “settle” and need a tiny retightening.
As long as everything stays tight and comfy, congratulations, you’ve successfully performed a DIY handlebar replacement!
Throughout this process, remember that patience and methodical work are your friends. None of the individual steps are very hard, and by giving each step due attention, you’ll ensure a safe and effective outcome.
Post-Installation Adjustments and Safety Checks
You’ve got your new handlebar on – great job! Now let’s make sure it stays a success in the long run. Proper follow-up and maintenance will keep your ride safe and comfortable:
Ensure Secure Alignment
After installation, double-check that the handlebar is perfectly centered in the stem and aligned with your front wheel. A misaligned bar can make your bike handle oddly.
Stand in front of the bike and visually confirm the bar is level and centered relative to the front tire. If not, loosen the stem and adjust as needed.
Final Torque Check
It’s worth reiterating: ensure all bolts are tightened to spec. The stem faceplate in particular must be tight.
Many stems list the torque value on the underside or in their manuals. If you tightened by feel, go by the rule that the handlebar shouldn’t twist at all under firm pressure.
If you can force it to rotate, it’s too loose (tighten gradually and evenly until secure). Improper installation can lead to accidents or discomfort, so taking a minute now to verify bolt tightness is key for safety.
Ergonomic Tweaks
Ride with the new handlebar for a few days and see how your body feels. Sometimes a small angle adjustment or sliding the seat a bit can optimize your new riding posture.
Don’t be afraid to make minor tweaks: for example, rotating the bar a few millimeters forward if you feel too upright, or moving your brake levers slightly if your wrists aren’t in a neutral position.
The beauty of a new handlebar setup is that you can tailor it. Just always re-tighten any bolts you loosen during adjustment.
Conduct a Test Ride and Listen
On your first real commute with the new bar, pay attention to any creaking or unusual feel. Everything should be solid.
After the ride, it’s wise to conduct a quick safety check – are the bolts still tight, and are the brake levers still positioned correctly?
Sometimes, especially if you didn’t use a torque wrench, bolts can settle and need a slight re-tighten after the first ride. Make sure nothing worked loose.
Regular Inspections
Going forward, integrate the handlebar into your regular bike maintenance routine. Every couple of weeks, give the bar a firm wiggle to ensure the stem hasn’t loosened.
Inspect for any signs of slipping or wear – the marks you used to center the bar can also serve as a reference; if they’re off-center later, that means the bar has slipped, indicating you need to tighten the stem bolts.
Also, keep an eye on your cables as you turn the bar; if you added a significantly higher or wider bar, the cables might rub or stretch more, so ensure they’re not fraying or binding.
Maintain Comfort
Little changes can creep in over time. Grips might shift, or your saddle height might need tweaking to match your new bar position (for instance, if your new bar is higher, you might benefit from raising your saddle a tad to keep your pedaling posture aligned).
Adjust as necessary. The goal is a comfortable, strain-free ride, so use your body’s feedback to refine the setup.
Stay Safe – Don’t Ignore Issues
If at any point you feel something is off – maybe a slight handlebar wobble or an odd noise when you pull up on the bars – stop and check.
It’s rare for properly installed handlebars to slip or crack, but if you notice any crack in the bar or stem, or persistent loosening, address it immediately.
Regularly inspect for any signs of wear, cracks, or loosening components to prevent problems. It’s much better to tighten a bolt in your garage than to have something come loose during a commute.
When in Doubt, Ask a Pro
There’s no shame in seeking help if something isn’t right. If you’re unsure about the installation or the bike’s handling afterward, a quick visit to a bike shop can be reassuring.
They can double-check your work – usually in minutes – and ensure the handlebar is secure and aligned.
Remember: while a handlebar swap is a rewarding DIY job, it’s crucial to prioritize accuracy and safety, so don’t hesitate to consult a professional if needed.
By following up your install with these checks and adjustments, you’ll ensure your new handlebar truly delivers on its promise: a more comfortable, controlled ride every time you head out on your commute.
Conclusion
Now, with your new handlebars set up for comfort and control, get out there and enjoy the ride! Your daily commute might just become the best part of your day, thanks to a simple change that put you in control of your ride’s ergonomics and style. Happy riding, and grab life by the handlebars (literally)!


