Replacing the electric bike brake lever is more than a simple parts swap – it’s an opportunity to restore responsive stopping power and maintain the safety features that make e‑bikes special.
An e‑bike’s braking system uses sensors to tell the motor to cut power as soon as you squeeze the lever.
Choosing the right replacement involves understanding whether your bike uses hydraulic or mechanical disc brakes or rim brakes, selecting a lever made from durable materials like aluminum or carbon fibre, ensuring it fits your handlebar and has adjustable reach for comfort.
This article explains when a brake lever should be replaced, how to choose the correct lever, and provides step‑by‑step guides for both mechanical and hydraulic systems.
It also explores brake sensors, why they are vital for cutting motor power and how to maintain them to meet safety and legal requirements.
Follow these instructions to keep your e‑bike stopping reliably and riding smoothly.
Related: Choosing the Best Brakes for Your Electric Bike: Hydraulic vs Mechanical
Understanding Your E‑Bike’s Braking System
Disc vs. Rim Brakes
Most modern e‑bikes use disc brakes, where pads squeeze a rotor attached to the wheel hub.
Disc brakes provide strong and consistent stopping power on rough terrain. Some budget or older e‑bikes still use rim brakes, which pinch the wheel rim itself.
The type of brake influences the lever you choose: hydraulic and mechanical levers are designed specifically for disc brakes, while rim brakes require levers with a different pull ratio.
Mechanical vs. Hydraulic Disc Systems
Mechanical disc brakes rely on a steel cable to pull the caliper. They are easier to maintain and more affordable but can require more finger force and frequent adjustment.
Hydraulic disc brakes use fluid in a sealed line; they offer smoother modulation and stronger braking but must be bled to remove air.
Your replacement lever must match the type of system on your bike.
Brake Sensors and Their Role
Unlike conventional bicycles, e‑bikes integrate brake sensors into the lever assembly. When you squeeze the lever, the sensor signals the motor controller to cut power.
Sensors may be mechanical (a simple switch pulled by a cable), hydraulic (activated by fluid pressure), or fully integrated designs.
They ensure the motor doesn’t fight against your braking and, in some jurisdictions, are required by law.
Maintaining these sensors and replacing them when damaged is essential for safe, legal riding.
Related: Torque Sensors in E-Bikes: Your Complete FAQ Guide for Smoother Rides
When and Why to Replace a Brake Lever
Brake levers are subject to wear and damage. Replace yours when:
-
Visible damage or cracks. Aluminum levers can bend or crack from accidents; steel levers may rust. Any structural damage compromises safety.
-
Spongy or inconsistent feel. Hydraulic levers that pull to the bar or feel soft may have air in the lines or a faulty seal and should be serviced or replaced.
-
Sensor failure. If the motor continues running when you brake, the sensor may be defective. Because sensors are integral to the lever, replacing the lever often solves the problem.
-
Upgrading for performance. Lighter materials like carbon fibre reduce weight, while adjustable levers improve ergonomics.
-
Changing brake type. Upgrading from mechanical to hydraulic brakes requires new levers compatible with the fluid system.
Choosing the Right Replacement Lever
Material Considerations
Different lever materials affect weight, durability and cost. The table below summarizes common choices:
| Material | Key Characteristics | Typical Use |
| Aluminum | Lightweight, corrosion‑resistant, good balance of strength and price | Most standard e‑bikes |
| Steel | Heavier, durable but prone to rust | Budget bikes and older models |
| Carbon fibre | Very light and strong but expensive | High‑performance e‑bikes |
Hydraulic vs. Mechanical Compatibility
Levers are designed specifically for mechanical or hydraulic brakes. Ensure the replacement matches your system. Mechanical levers pull a cable; hydraulic levers push fluid and often include an integrated reservoir. Mismatching them can lead to poor braking or brake failure.
Handlebar Fit and Ergonomics
Most e‑bike handlebars are 22.2 mm or 23.8 mm in diameter. Measure the bar where the lever mounts and choose a lever that clamps securely. Look for models with adjustable reach so you can position the lever comfortably relative to the grip. Ergonomic shapes reduce hand fatigue on long rides.
Brand and Quality
Trusted brands like Shimano, Avid and Tektro offer reliable brake levers with good customer support. Cheaper generic levers may lack durability or spare parts support. Spend a little more for quality – braking is not an area to compromise.
Preparing for the Replacement
Replacing a brake lever is a straightforward DIY job, but preparation is crucial for safety and ease:
-
Tools: For mechanical levers, you’ll need flat‑head screwdrivers, rubbing alcohol (to lubricate grips), paper towels, side cutters, 3 mm and 5 mm Allen wrenches, a torque wrench and zip ties.
For hydraulic systems, add a bike stand, additional Allen sizes, a brake pad separator and possibly bleeding equipment.
-
Safety first: Turn off the e‑bike, remove the battery and press the power button to discharge residual energy before working. Photograph the existing setup so you can reroute cables correctly later. If you’re not confident, consult a professional.
-
Get the right part: Ensure your replacement lever includes the correct brake sensor connector for your e‑bike’s controller. Many e‑bike levers use a 2‑pin plug; check your manual.
Step‑by‑Step Guide: Replacing Mechanical Brake Levers

This procedure applies to cable‑actuated disc or rim brakes.
-
Prepare the bike. Turn off power, remove the battery and discharge residual power.
-
Remove the handlebar grip. Pry off the end cap with a flat‑head screwdriver and pull off the grip. Rubbing alcohol helps loosen tight grips.
-
If replacing the right lever, remove the throttle. Unplug the throttle connector, snip zip ties and loosen the throttle clamp with a 3 mm Allen key. Slide off the throttle and note spacer orientation for reassembly.
-
Create cable slack. At the brake caliper, use a 5 mm Allen wrench to loosen the pinch bolt and create slack.
-
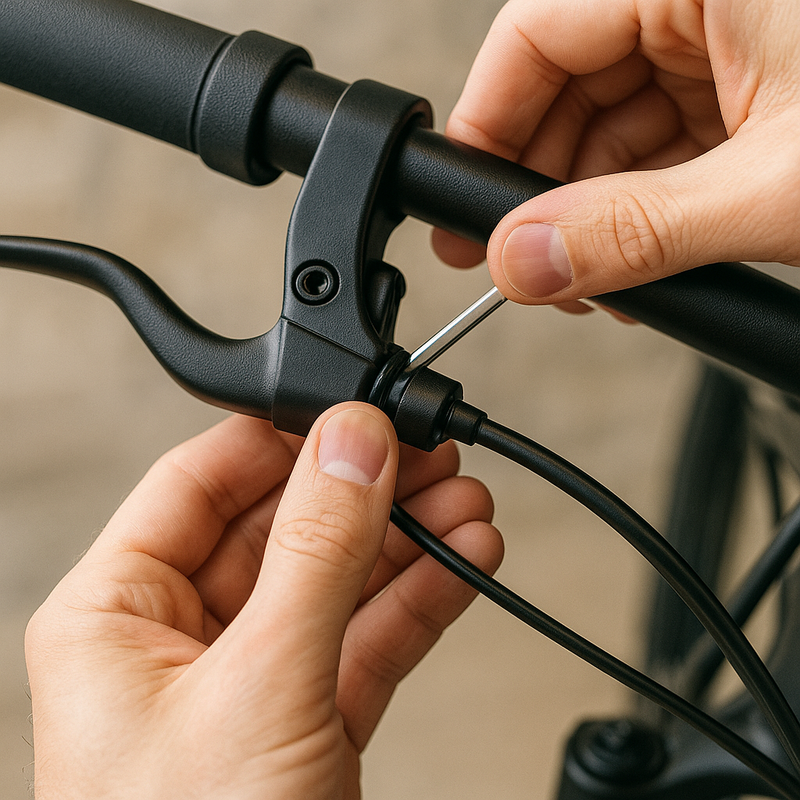
Remove the old lever. Align the barrel adjuster slots with the lever housing and release the cable. Unplug the brake‑sensor connector. Loosen the lever clamp bolt with a 5 mm Allen key and slide the lever off.
-
Install the new lever. Slide it onto the handlebar, matching the angle of the other lever. Tighten the clamp bolt to the torque specified in your manual.
-
Reconnect the brake cable. Thread the cable into the new lever and secure the housing in the barrel adjuster. Tighten the locknut against the housing and reconnect the sensor plug.
-
Adjust cable tension. Pull the cable taut at the caliper and tighten the pinch bolt. Squeeze the lever; adjust tension or reach as needed.
-
Reinstall removed components. Slide the throttle (if applicable) and grip back on, tightening bolts and replacing zip ties.
-
Final checks. Replace the battery and test the brakes at low speed. Make sure the motor cuts off when braking and that the lever doesn’t hit the handlebar.

Step‑by‑Step Guide: Replacing Hydraulic Brake Levers
Hydraulic brakes require careful handling to keep air and contaminants out of the system. If you’re uncomfortable with these steps, have a professional mechanic perform the work.
-
Safety and preparation. Turn off and discharge the bike. Use a bike stand or lift; avoid flipping the bike upside down to prevent air from entering the brake lines.
-
Remove the caliper and brake hose. For the caliper you’re replacing, remove the mounting bolts with a 5 mm Allen wrench and detach the brake hose from clips or brackets, cutting zip ties as necessary. Do not disconnect the hose from the lever unless you intend to bleed the system – the lever, hose and caliper form a sealed unit.
-
Prepare the handlebar. Remove grips or throttle if they obstruct the lever. Unbolt and slide off the old lever.
-
Install the new lever. Slide it onto the bar and tighten the clamp bolt to specification. Route the new hose neatly along the frame, securing it with zip ties or clips and avoiding kinks.
-
Install the new caliper. Position it over the rotor, insert bolts and partially tighten. Pull the brake lever to center the caliper, then tighten bolts fully.
-
Reconnect the brake cable and sensor. If your brake set has a separate sensor wire, plug it into the controller. Adjust the lever reach for comfort.
-
Final checks and bleeding. Replace any zip ties, reinstall grips and throttle. Test the brakes at low speed; ensure there is no rubbing and the lever feels firm. If the lever feels spongy or the pads rub, the system may need bleeding – a more advanced procedure best left to professionals.
Understanding and Maintaining Brake Sensors
How Brake Sensors Work
Brake sensors, hidden inside the lever, send a signal to cut motor power or engage regenerative braking.
Mechanical sensors use a switch activated by cable tension; hydraulic sensors detect fluid pressure; integrated sensors build the sensing mechanism into the motor controller.
Some high‑end systems add Hall‑effect sensors for redundancy.
Why Sensors Matter
By cutting motor power as soon as you brake, sensors prevent the motor from pushing against your stopping effort and contribute to safer and smoother stops.
Many jurisdictions require functional ebike brake sensors to meet legal standards.
Sensors also improve riding feel by coordinating regenerative braking and motor cut‑off. A study noted that a significant share of e‑bike accidents were linked to brake failures, underscoring the importance of maintaining braking components.
Maintenance Best Practices
-
Regular inspection. Before each ride, check that the sensor wire is intact and the motor cuts off when the brake is squeezed.
-
Keep it clean. Wipe dirt or moisture from the lever and sensor wiring; in muddy conditions, clean more often.
-
Adjust and align. If the motor doesn’t shut off when you brake, realign the sensor or magnet (for magnetic sensors) or adjust cable tension.
-
Seek help for complex issues. For blinking brake icons on your display or problems with regenerative braking, consult a professional mechanic.
Post‑Installation Checks & Ongoing Maintenance
After installing new levers, take time to fine‑tune your brake system:
-
Adjust lever reach. Use the reach adjust screw to ensure a comfortable distance between lever and grip. For mechanical brakes, adjust barrel adjusters and cable tension so the pads engage without excessive lever travel.
-
Center the calipers. Loosen the caliper bolts, squeeze the lever to align pads with the rotor and retighten. Check for rubbing by spinning the wheel.
-
Bed in new pads and rotors. With new components, perform a bedding‑in procedure: accelerate to moderate speed and brake firmly 10–20 times to transfer an even layer of pad material to the rotor.
-
Monitor and maintain. Clean levers and cables regularly, inspect for wear and replace pads or rotors as needed. For hydraulic systems, check for leaks and have the system bled if the lever feels spongy.
-
Test regularly. Conduct a full brake test after any maintenance or replacement. Ensure the motor cutoff works and there is no abnormal noise or vibration.
Conclusion
Replacing an e‑bike brake lever restores confident stopping and keeps the motor’s safety features working properly.
Start by understanding your bike’s braking system – whether it uses rim or disc brakes and whether the brakes are mechanical or hydraulic.
Select a lever made from the right material, sized for your handlebar, and designed for your brake type.
Prepare carefully: gather tools, discharge the bike and document your setup. Follow the appropriate step‑by‑step guide for mechanical or hydraulic brakes.
Pay attention to the brake sensor – it cuts power and is often required by law. After installation, adjust reach, center calipers and bed in pads.
Finally, inspect and maintain your brakes regularly so your rides remain safe, smooth and enjoyable


